<?xml version="1.0" encoding="utf-8"?><feed xmlns="http://www.w3.org/2005/Atom" ><generator uri="https://jekyllrb.com/" version="3.8.4">Jekyll</generator><link href="https://www.filestash.app/feed.xml" rel="self" type="application/atom+xml" /><link href="https://www.filestash.app/" rel="alternate" type="text/html" /><updated>2026-06-09T03:38:37+00:00</updated><id>https://www.filestash.app/feed.xml</id><title type="html">Filestash — Self-hosted client for your data</title><subtitle>The official website for Filestash (formerly Nuage), the self-hosted web client for your data</subtitle><entry><title type="html">Managing Certificates</title><link href="https://www.filestash.app/docs/guide/managing-certificates.html" rel="alternate" type="text/html" title="Managing Certificates" /><published>2026-06-08T00:00:00+00:00</published><updated>2026-06-08T00:00:00+00:00</updated><id>https://www.filestash.app/docs/guide/managing-certificates</id><content type="html" xml:base="https://www.filestash.app/docs/guide/managing-certificates.html"><![CDATA[<p>Without importing a root certificate you get issues like this:</p>
<div class="highlighter-rouge"><div class="highlight"><pre class="highlight"><code>~/filestash # curl https://127.0.0.1:8334/healthz
curl: (60) SSL certificate OpenSSL verify result: self-signed certificate (18)
More details here: https://curl.se/docs/sslcerts.html

curl failed to verify the legitimacy of the server and therefore could not
establish a secure connection to it. To learn more about this situation and
how to fix it, please visit the webpage mentioned above.
</code></pre></div></div>

<p>Once we are done with the import you will get:</p>
<div class="highlighter-rouge"><div class="highlight"><pre class="highlight"><code>~/filestash # curl https://127.0.0.1:8334/healthz
{"status": "pass"}
</code></pre></div></div>

<p><em>Note</em>: on windows, use <code class="highlighter-rouge">curl.exe</code> instead of <code class="highlighter-rouge">curl</code></p>

<h2 id="linux">Linux</h2>

<p>To import the certificate:</p>
<div class="highlighter-rouge"><div class="highlight"><pre class="highlight"><code>~/filestash # sudo cp dist/data/state/certs/cert.pem /usr/local/share/ca-certificates/filestash.crt
~/filestash # sudo update-ca-certificates
Updating certificates in /etc/ssl/certs...
0 added, 0 removed; done.
Running hooks in /etc/ca-certificates/update.d...
Processing triggers for ca-certificates-java (20260311)…
done.
Updating Mono key store
Mono Certificate Store Sync - version 6.12.0.199
Populate Mono certificate store from a concatenated list of certificates.
Copyright 2002, 2003 Motus Technologies. Copyright 2004-2008 Novell. BSD licensed.

Importing into legacy system store:
I already trust 121, your new list has 122
Certificate added: O=Filestash
1 new root certificates were added to your trust store.
Import process completed.

Importing into BTLS system store:
I already trust 121, your new list has 122
Certificate added: O=Filestash
1 new root certificates were added to your trust store.
Import process completed.
Done
done.
</code></pre></div></div>

<h2 id="windows">Windows</h2>

<p>From an Administrator command prompt, import the certificate into the machine root store with <code class="highlighter-rouge">certutil</code>:</p>
<div class="highlighter-rouge"><div class="highlight"><pre class="highlight"><code>C:\Users\filestash&gt; certutil -addstore -f Root .\cert.pem
Root "Trusted Root Certification Authorities"
Signature matches Public Key
Certificate "O=Filestash" added to store.
CertUtil: -addstore command completed successfully.
</code></pre></div></div>]]></content><author><name></name></author><summary type="html"><![CDATA[a guide to import certificates]]></summary></entry><entry><title type="html">The landscape for self-hosted Office documents in 2026</title><link href="https://www.filestash.app/2026/05/25/selfhosted-word/" rel="alternate" type="text/html" title="The landscape for self-hosted Office documents in 2026" /><published>2026-05-25T00:00:00+00:00</published><updated>2026-05-25T00:00:00+00:00</updated><id>https://www.filestash.app/2026/05/25/selfhosted-word</id><content type="html" xml:base="https://www.filestash.app/2026/05/25/selfhosted-word/"><![CDATA[<style>
#main h1 { font-size: 2rem; }
#main .screenshot {
    display: flex;
    flex-wrap: wrap;
    gap: 1rem;
    align-items: flex-start;
    margin: 1.5rem 0;
}
#main .screenshot figure {
    flex: 0 0 calc(50% - 0.5rem);
    min-width: 0;
    margin: 0;
}
#main .screenshot figure img {
    width: 100%;
    height: auto;
    display: block;
    border-radius: 5px;
}
#main figcaption {
    margin-top: 5px;
    font-size: 0.9rem;
    text-align: center;
    font-style: italic;
}
@media (max-width: 600px) {
    #main .screenshot { flex-direction: column; }
}
</style>

<p>A few months ago, the LibreOffice team <a href="https://blog.documentfoundation.org/blog/2026/02/24/libreoffice-online-a-fresh-start/">announced the restarting of LibreOffice Online</a>. The <a href="https://old.reddit.com/r/selfhosted/comments/1risj9w/libreoffice_online_which_paused_development_in/">r/selfhosted thread that followed</a> made one thing obvious: the community seems to believe self hosting office documents is a choice between Collabora and OnlyOffice. Well it isn’t.</p>

<p>Over the last few years, new options have become usable and the lanscape is much wider than it was a few years back. In fact, they all fall into 2 families:</p>
<ol>
  <li><a href="#client-side-options">client side options</a></li>
  <li><a href="#server-side-options">server side options</a></li>
</ol>

<h2 id="client-side-options">Client side options</h2>

<p>Some solutions run entirely in your browser with 0 server side components. You will find:</p>

<div class="screenshot">
    <figure>
        <a href="https://downloads.filestash.app/img/app-filestash-www-img-screenshots-application-docxjs.png"><img class="fancy" src="https://downloads.filestash.app/img/app-filestash-www-img-screenshots-application-docxjs.png" /></a>
        <figcaption class="center">docxjs: <a href="https://docx.js.org">website</a>, <a href="https://github.com/dolanmiu/docx">github</a>, <a href="#">filestash plugin</a></figcaption>
    </figure>

    <figure>
        <a href="https://downloads.filestash.app/img/app-filestash-www-img-screenshots-application-office.png"><img class="fancy" src="https://downloads.filestash.app/img/app-filestash-www-img-screenshots-application-office.png" /></a>
        <figcaption>LibreOffice wasm: <a href="https://wiki.documentfoundation.org/Development/WASM">website</a>, <a href="https://git.libreoffice.org/core/+/refs/heads/master/static/README.wasm.md">code</a>, <a href="https://downloads.filestash.app/upload/application_docxjs.zip">filestash plugin</a></figcaption>
    </figure>

    <figure>
        <a href="https://downloads.filestash.app/img/app-filestash-www-img-screenshots-application-docx.png"><img class="fancy" src="https://downloads.filestash.app/img/app-filestash-www-img-screenshots-application-docx.png" /></a>
        <figcaption>docx-editor: <a href="https://www.docx-editor.dev/">website</a>, <a href="https://github.com/eigenpal/docx-js-editor">code</a>, <a href="https://downloads.filestash.app/upload/application_docx.zip">filestash plugin</a></figcaption>
    </figure>
</div>

<p>
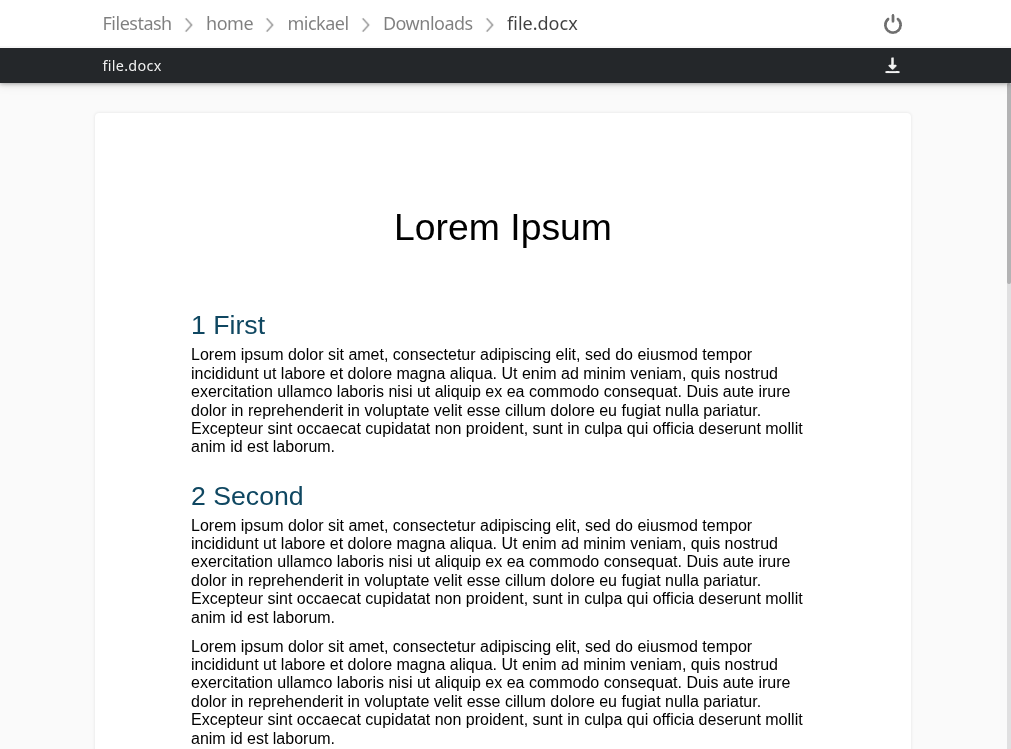
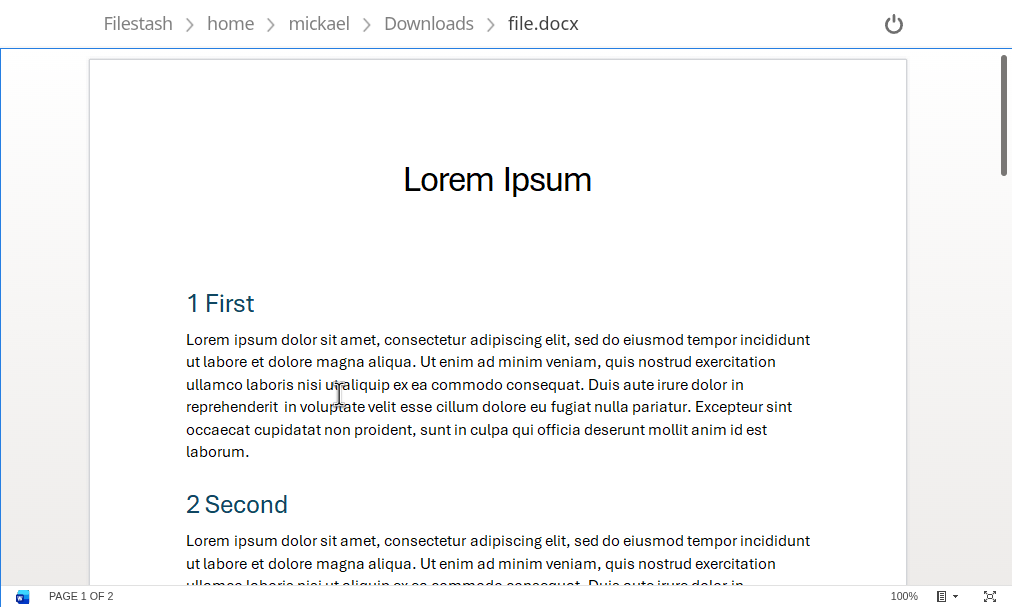
docx.js is a viewer only that is converting your word document into an html file that more or less looks the part. The other 2, LibreOffice wasm and docx-editor don’t just render your docs but are full fledged editors.</p>

<p>
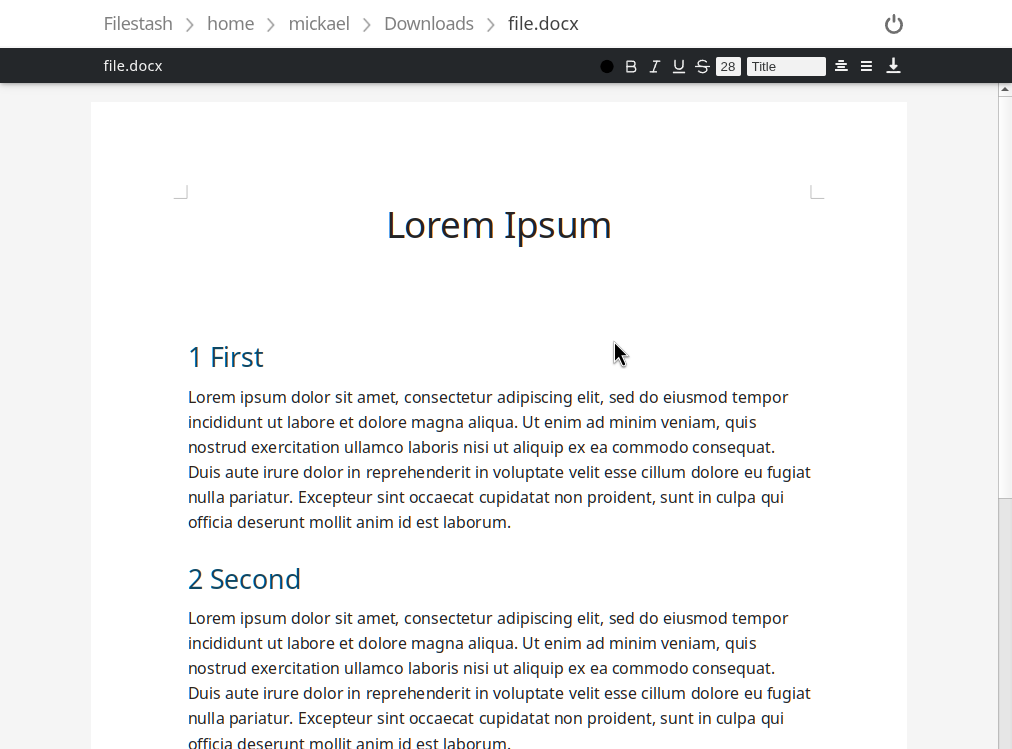
If you need to handle more than docx, including the god awful .doc format, LibreOffice wasm is the only game in town. It will open anything you throw at it the same way LibreOffice desktop does, because it’s literally the same codebase compiled for the browser. That power comes with a real cost. The WASM payload is around 50MB even after Brotli compression, and once it’s running it will happily chew through about 800MB of RAM for the privilege. Also, because of <a href="https://en.wikipedia.org/wiki/Spectre_(security_vulnerability\)">Spectre</a> it requires a couple of headers to unlock SharedArrayBuffer.</p>

<p>
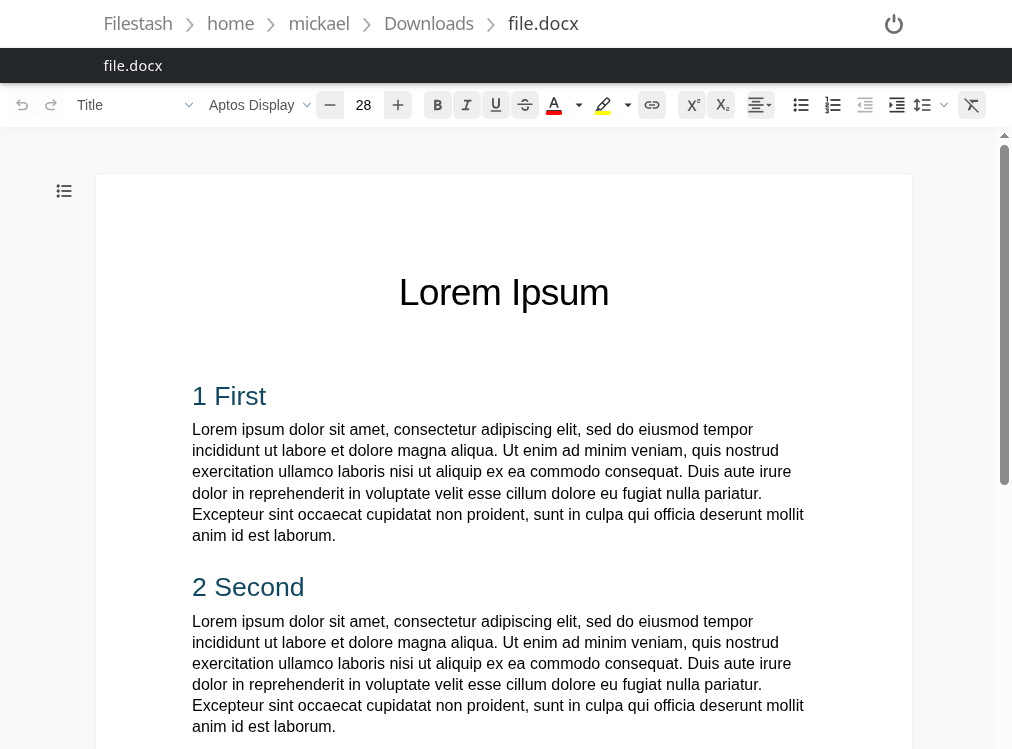
docx-editor goes the other way. It only handles .docx, but it’s small and fast. The tradeoff is maturity: it’s the newest of the 3, and it hasn’t had the decades of fixes that shaped LibreOffice. Expect rougher edges which will hopefully smooth out over time.</p>

<p><em>Note:</em> to use the Filestash plugin, put the whole zip in the plugins folder (without unzipping it!) and restart your instance.</p>

<h2 id="server-side-options">Server side options</h2>

<p>The gold standard for server side office editors is the <a href="https://learn.microsoft.com/en-us/microsoft-365/cloud-storage-partner-program/online/">WOPI protocol</a>, a protocol made by Microsoft for third party to integrate with Office Online, and which has since taken over the self hosted world.</p>

<p>
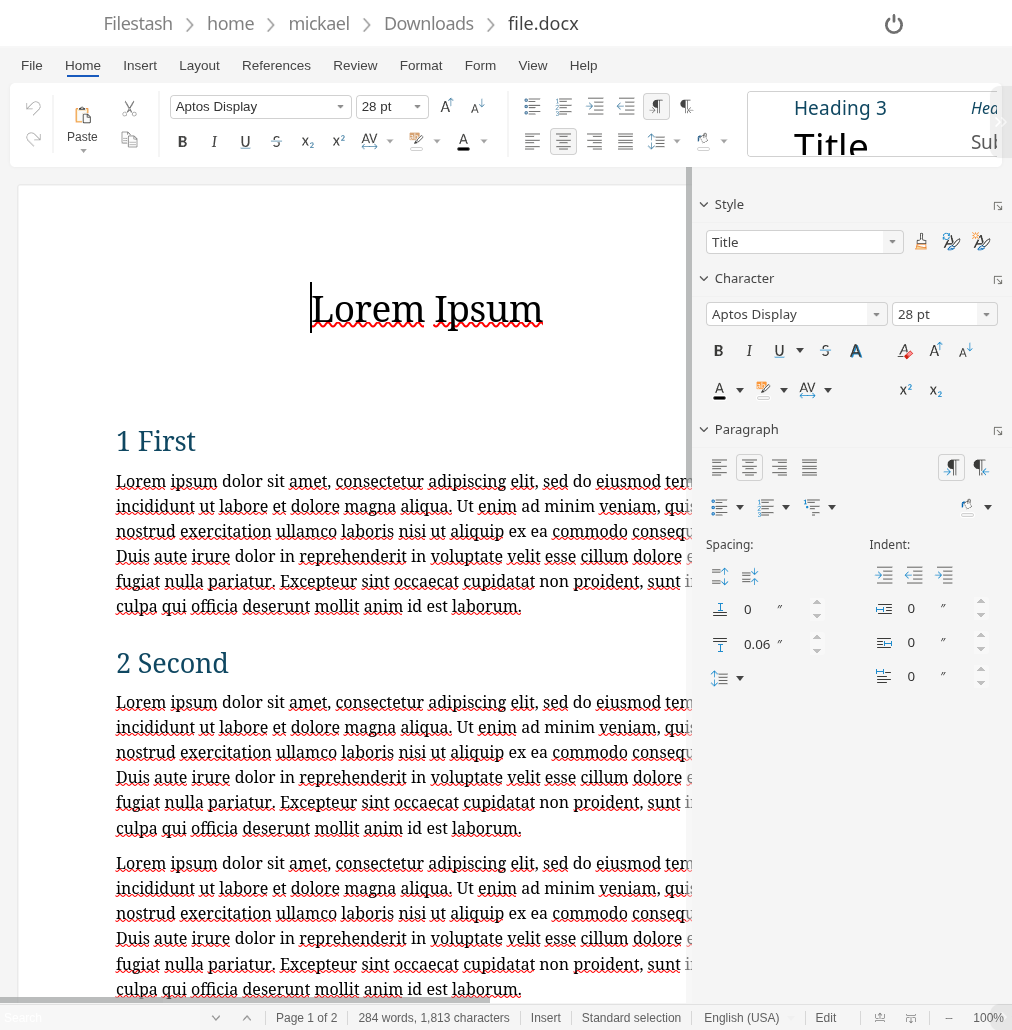
Microsoft being Microsoft, not everyone can integrate with <a href="https://learn.microsoft.com/en-us/microsoft-365/cloud-storage-partner-program/online/">Microsoft 365 for the web</a>: you need to apply to their <a href="https://aka.ms/cspp-apply">Cloud Storage Partner Program</a>, and giving your users the ability to selfhost their own data is against their rules. The very first clause in their minimum requirements mandates: “1. Be a proprietary cloud storage environment owned wholly by the partner company”. That opened the door to other contenders like Collabora and Only Office:</p>

<div class="screenshot">
    <figure>
        <a href="https://downloads.filestash.app/img/app-filestash-www-img-screenshots-application-collabora.png"><img class="fancy" src="https://downloads.filestash.app/img/app-filestash-www-img-screenshots-application-collabora.png" /></a>
        <figcaption>Collabora: <a href="https://www.collaboraonline.com/">website</a>, <a href="https://github.com/CollaboraOnline/online">github</a>, <a href="https://github.com/mickael-kerjean/filestash/tree/master/server/plugin/plg_editor_wopi">filestash plugin</a></figcaption>
    </figure>

    <figure>
        <a href="https://downloads.filestash.app/img/app-filestash-www-img-screenshots-application-onlyoffice.png"><img class="fancy" src="https://downloads.filestash.app/img/app-filestash-www-img-screenshots-application-onlyoffice.png" /></a>
        <figcaption>OnlyOffice: <a href="https://www.onlyoffice.com/">website</a>, <a href="https://github.com/ONLYOFFICE/">github</a>, <a href="https://github.com/mickael-kerjean/filestash/tree/master/server/plugin/plg_editor_wopi">filestash plugin</a></figcaption>
    </figure>
</div>

<p>
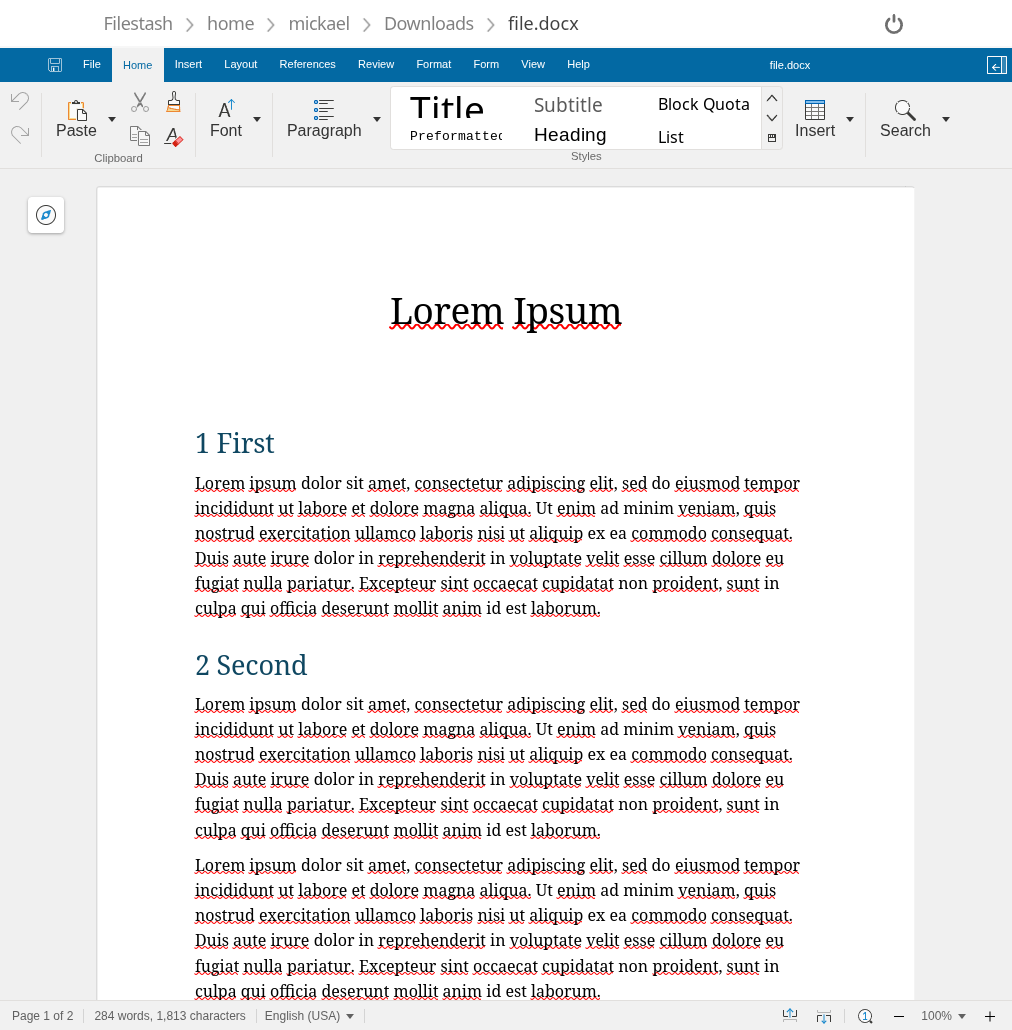
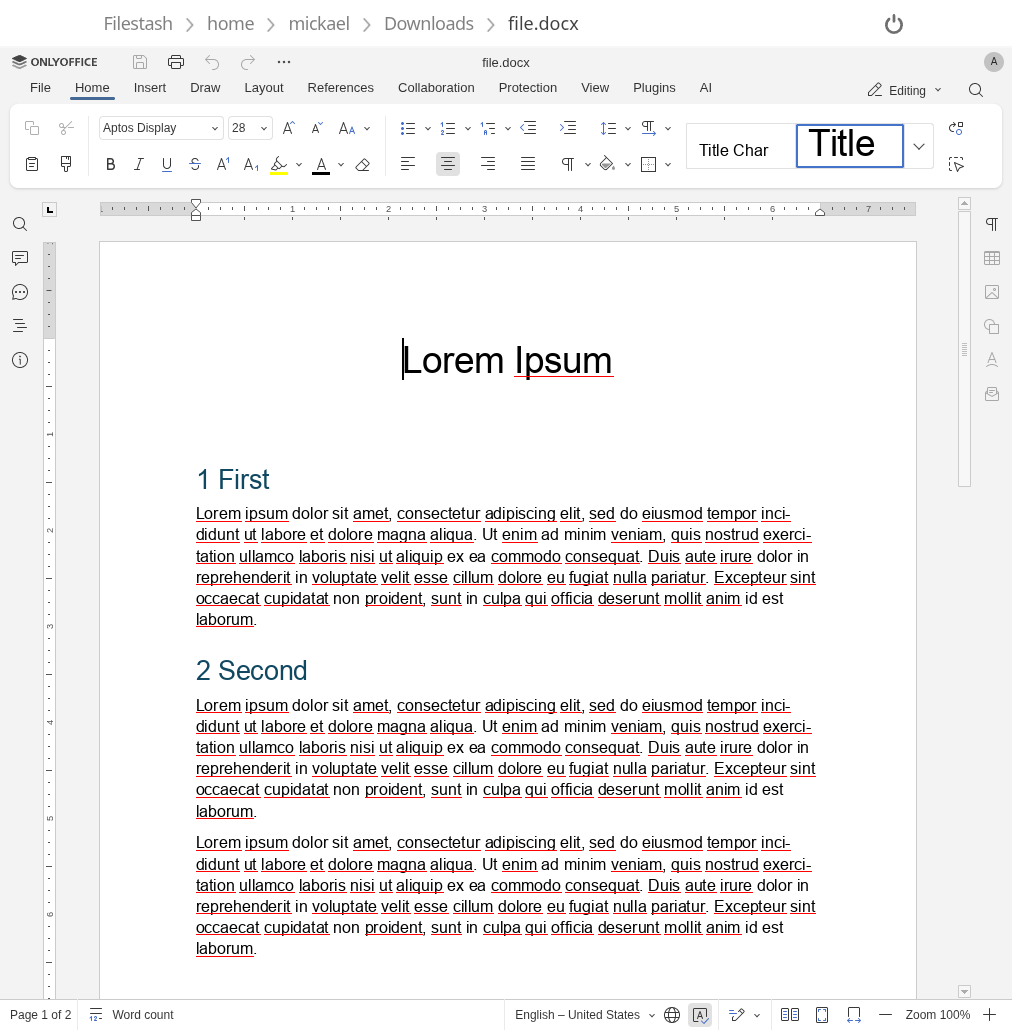
Both can be styled so they look more like the real Microsoft word. For example using our collabora <a href="https://gist.githubusercontent.com/mickael-kerjean/bc1f57cd312cf04731d30185cc4e7ba2/raw/d706dcdf23c21441e5af289d871b33defc2770ea/destop.css">stylesheet</a>, collabora will look like this:</p>

<figure>
    <a href="https://downloads.filestash.app/img/app-filestash-www-img-screenshots-application-collabora-css.png"><img class="fancy" src="https://downloads.filestash.app/img/app-filestash-www-img-screenshots-application-collabora-css.png" /></a>
    <figcaption>Collabora with our stylesheet</figcaption>
</figure>

<!--
version: '2'
services:
  app:
    container_name: filestash
    image: machines/filestash:latest
    restart: always
    environment:
    - APPLICATION_URL=
    - CANARY=true
    - OFFICE_URL=http://wopi_server:9980
    - OFFICE_FILESTASH_URL=http://app:8334
    - OFFICE_REWRITE_URL=http://127.0.0.1:9980
    ports:
    - "8334:8334"
    volumes:
    - filestash:/app/data/state/

  wopi_server:
    container_name: filestash_wopi
    image: collabora/code:24.04.10.2.1
    restart: always
    environment:
    - "extra_params=--o:ssl.enable=false"
    - aliasgroup1="https://.*:443"
    command:
    - /bin/bash
    - -c
    - |
         curl -o /usr/share/coolwsd/browser/dist/branding-desktop.css https://gist.githubusercontent.com/mickael-kerjean/bc1f57cd312cf04731d30185cc4e7ba2/raw/d706dcdf23c21441e5af289d871b33defc2770ea/destop.css
         /bin/su -s /bin/bash -c '/start-collabora-online.sh' cool
    user: root
    ports:
    - "9980:9980"

volumes:
    filestash: {}
-->

<p>Then come third party vendors who don’t have selfhosting options and requires custom integrations to be made:</p>
<ul>
  <li>zoho office - <a href="https://demo.office-integrator.com">demo</a></li>
  <li>syncfusion - <a href="https://www.syncfusion.com/free-tools/online-docx-editor">demo</a></li>
  <li>apryse - <a href="https://apryse.com/blog/webviewer/create-edit-word-docx-document-in-web-app">demo</a></li>
  <li>the unoficial Microsoft preview:</li>
</ul>
<figure>
    <a href="https://downloads.filestash.app/img/app-filestash-www-img-screenshots-application-msoffice.png"><img class="fancy" src="https://downloads.filestash.app/img/app-filestash-www-img-screenshots-application-msoffice.png" /></a>
    <figcaption>MS Office</figcaption>
</figure>

<h2 id="conclusion">Conclusion</h2>

<p>There’s no single winner here, only tradeoffs that depend on your situation. If you need collaborative editing, full feature parity with Word, enterprise support, and you have the server to run it, Collabora is my pick today. If document is not where your users spend most of their time, and you’re happy covering the 95% of cases people actually hit, client side options are awesome and much lighter to operate. If you’d rather not run any of this yourself, the commercial SaaS integrators are another trade off.</p>

<p>To use any of these options, Filestash is sticking to its <a href="https://github.com/mickael-kerjean/filestash#vision--philosophy">plugin based architecture</a>, so you can use whichever integration works best for you so you can run your very own <a href="/word-online.html">word online service</a></p>]]></content><author><name></name></author><summary type="html"><![CDATA[A breakdown of every self-hosted approach to handle Office documents]]></summary></entry><entry><title type="html">Storage Gateways</title><link href="https://www.filestash.app/docs/guide/storage-gateway.html" rel="alternate" type="text/html" title="Storage Gateways" /><published>2026-04-14T00:00:00+00:00</published><updated>2026-04-14T00:00:00+00:00</updated><id>https://www.filestash.app/docs/guide/gateways</id><content type="html" xml:base="https://www.filestash.app/docs/guide/storage-gateway.html"><![CDATA[<p>Storage Gateways define the various access methods supported by your Filestash instance. They act as translators between protocols, proxying traffic to your downstream storage:</p>

<div id="mermaid-diagram" style="visibility: hidden;">
graph LR
    A[SFTP Client] --&gt;|SFTP| GW[Filestash Gateway]
    B[S3 Client] --&gt;|S3| GW
    C[...] --&gt;|Protocol X| GW
    GW --&gt;|FTP| S1[FTP Server]
    GW --&gt;|S3| S2[AWS S3]
    GW --&gt;|Protocol Y| S3[...]
</div>
<script src="https://cdn.jsdelivr.net/npm/mermaid/dist/mermaid.min.js"></script>

<script>
mermaid.initialize({ startOnLoad: false });
mermaid.render("mermaid-svg", document.getElementById("mermaid-diagram").textContent).then(({ svg }) => {
    const el = document.getElementById("mermaid-diagram");
    el.innerHTML = svg;
    el.querySelector("svg").classList.add("fancy");
    el.style.visibility = "visible";
});
</script>

<p>Filestash supports a number of gateways including <a href="/docs/guide/sftp-gateway.html">SFTP</a>, WebDAV, S3, <a href="/docs/guide/mcp-gateway.html">MCP</a>, and AS2. Each gateway exposes an inbound interface that speaks a specific protocol, accepting connections from clients that speak that particular protocol. Downstream of that interface, you keep your existing storage. Filestash is not where your data lives. Data stays under your control, on your own infrastructure. Filestash is just a proxy, a humble translator between different protocols.</p>

<div class="related">
    <div class="title">
        Related Articles <br />
        <img src="/img/illustration/arrow_bottom.png" />
    </div>
    <div class="related_content">
        <a href="/docs/guide/sftp-gateway.html"><h3 class="no-anchor">SFTP Gateway</h3></a><a href="/docs/guide/mcp-gateway.html"><h3 class="no-anchor">MCP Gateway</h3></a>
    </div>
</div>]]></content><author><name></name></author><summary type="html"><![CDATA[A guide on how to expose your data over a particular protocol]]></summary></entry><entry><title type="html">How Filestash handle configuration</title><link href="https://www.filestash.app/docs/guide/configuration.html" rel="alternate" type="text/html" title="How Filestash handle configuration" /><published>2026-04-02T00:00:00+00:00</published><updated>2026-04-02T00:00:00+00:00</updated><id>https://www.filestash.app/docs/guide/configuration</id><content type="html" xml:base="https://www.filestash.app/docs/guide/configuration.html"><![CDATA[<p>Filestash stores its entire configuration in a single file named <code class="highlighter-rouge">config.json</code>, located by default under the <code class="highlighter-rouge">state/config</code> folder. Everything you see in the admin console under the settings and storage pages is a projection of this file, wrapped in a UI to make it easy to edit and understand. In this guide, we will peel back the layers so you can make sense of how configuration works and what are the customisation points.</p>

<h2 id="structure-of-the-configuration-file">Structure of the configuration file</h2>

<p>We already alluded to it but it’s worth repeating: the /admin/storage and /admin/settings pages are nothing but direct projections of the config.json file. This config.json file naturally splits into two parts:</p>

<ol>
  <li>the storage section, mapping to /admin/storage</li>
  <li>the settings section, mapping to /admin/settings</li>
</ol>

<h3 id="part1---the-storage-page">PART1 - The storage page</h3>

<p>In the config.json file, these are the fields relevant to the storage page:</p>
<div class="highlighter-rouge"><div class="highlight"><pre class="highlight"><code>{
    ...
    "connections": [ // &lt;- (1) storage backend
        {"type": "s3", "label": "mystorage"}
    ],
    ...
    "middleware": { // &lt;- (2) authentication middleware
        "identity_provider": {
            "type": "ldap",
            "params": "..."
        },
        "attribute_mapping": {
            "related_backend": "mystorage", // &lt;- foreign keys to the storage backend
            "params": "..." // &lt;- mapping rules for the storages defined in related_backend
        }
    },
    ...
}
</code></pre></div></div>

<p>If you visit the /admin/storage page, you will see 2 blocks:</p>

<ol>
  <li><strong>Storage Backend</strong>: defines which storage you want to use, whether that’s <a href="/s3-browser.html">S3</a>, <a href="/sftp-client.html">SFTP</a>, IPFS, or anything else. In the config.json, this is the <code class="highlighter-rouge">connections</code> key which contains a list of all the storage backends you have enabled. Each entry has a <code class="highlighter-rouge">label</code> that acts as a primary key, referenced by <code class="highlighter-rouge">attribute_mapping.related_backend</code> to link authentication to that storage.</li>
  <li><strong>Authentication Middleware</strong>: optional. Without it, users see the raw login form and need to know the technical details of your storage (server address, access keys, etc.). Enable it to authenticate users through an IDP and automatically connect them to the right storage. In the config.json, this lives in the <code class="highlighter-rouge">middleware</code> section which has 2 pieces to:
    <ol>
      <li>Configure which <code class="highlighter-rouge">identity_provider</code> to use (typically “openid”, “saml”, or “ldap”) along with the parameters for your IDP.</li>
      <li>Define an <code class="highlighter-rouge">attribute_mapping</code> to generate storage connections from the user’s identity, referencing which storage backend it should apply to.</li>
    </ol>
  </li>
</ol>

<p>The attribute mapping <code class="highlighter-rouge">params</code> field is a JSON string following this structure:</p>
<div class="highlighter-rouge"><div class="highlight"><pre class="highlight"><code>{
    "mystorage": {"type":"s3","access_key_id":"...","secret_access_key":"..."},
    "other": {"type":"blackhole"}
}
</code></pre></div></div>
<p>For the full list of fields available for each storage backend, see <a href="/docs/guide/virtual-filesystem.html#storage-specs">this guide</a>.</p>

<style>ol ol { padding-top: 10px; }</style>

<h3 id="part2---the-settings-page">PART2 - The settings page</h3>

<p>Everything in config.json that isn’t <code class="highlighter-rouge">connections</code> or <code class="highlighter-rouge">middleware</code> belongs to the settings section. The structure is not fixed as plugins can extend it with their own configuration keys. For example, the <a href="/docs/guide/sftp-gateway.html">SFTP gateway plugin</a> adds settings for the private key and other options specific to running an SFTP service. Most plugins follow the same pattern.</p>

<p>If you open the config.json alongside the settings page, you will see how the JSON keys map directly to what you see in the UI:</p>

<div class="highlighter-rouge"><div class="highlight"><pre class="highlight"><code>{
   "general": {        // &lt;- that's your first level title
       "name": ...
       ...
   },
   "features": {       // &lt;- next first level title
       "api": {        // &lt;- second level title
          ...
       },
       ...
   },
   ...
}
</code></pre></div></div>

<h2 id="alternative-adapters">Alternative Adapters</h2>

<p>The <a href="https://www.filestash.app/docs/plugin/#configuration" rel="nofollow">plugin inventory</a> lists two alternatives to the default filesystem storage:</p>

<ol>
  <li>
    <p><strong>plg_config_s3</strong>: stores your configuration in an S3 bucket, which is useful for cluster wide deployments where every replica needs to share the same config.</p>
  </li>
  <li>
    <p><strong>plg_config_env</strong>: makes the configuration read only and self contained in a single environment variable. Generate it from an existing config with: <code class="highlighter-rouge">CONFIG_JSON=$(cat config.json | base64 -w0)</code></p>
  </li>
</ol>

<p><em>Note:</em> both of these are <a href="/docs/guide/plugin-development.html#compiled-plugin">compiled plugins</a> and must be built directly into the Filestash binary.</p>

<h2 id="creating-your-own-adapter">Creating your own Adapter</h2>

<p>In line with our <a href="https://github.com/mickael-kerjean/filestash?tab=readme-ov-file#vision--philosophy">plugin based architecture</a>, you can create your own configuration adapter. The approach is to write a Go generator that overrides <a href="https://github.com/mickael-kerjean/filestash/blob/master/server/common/config_state.go" rel="nofollow">config_state.go</a> and implements two functions:</p>

<div class="highlighter-rouge"><div class="highlight"><pre class="highlight"><code>func LoadConfig() ([]byte, error) {
    // return the configuration as JSON
}

func SaveConfig(v []byte) error {
    // persist the JSON configuration
}
</code></pre></div></div>

<p>This is exactly how the adapters listed above work. The same mechanism powers undocumented variants too. For example, the AWS Marketplace build uses a custom adapter that stores config in S3 with partitioning based on the account ID, along with a few convenience features specific to that environment.</p>]]></content><author><name></name></author><summary type="html"><![CDATA[The reference guide to handle configuration in Filestash]]></summary></entry><entry><title type="html">Install Filestash on Kubernetes using Helm</title><link href="https://www.filestash.app/docs/guide/helm.html" rel="alternate" type="text/html" title="Install Filestash on Kubernetes using Helm" /><published>2026-04-01T00:00:00+00:00</published><updated>2026-04-01T00:00:00+00:00</updated><id>https://www.filestash.app/docs/guide/k8s</id><content type="html" xml:base="https://www.filestash.app/docs/guide/helm.html"><![CDATA[<!--
For local testing:
```
curl -sfL https://get.k3s.io | sh -
curl -fsSL -o get_helm.sh https://raw.githubusercontent.com/helm/helm/main/scripts/get-helm-4
chmod 700 get_helm.sh && ./get_helm.sh
export KUBECONFIG=/etc/rancher/k3s/k3s.yaml
```
-->

<p>Install the Helm chart:</p>

<div class="terminal">
<span class="prompt">~/$ </span>helm install filestash https://downloads.filestash.app/upload/filestash-helm.tgz<br />
<span class="stdout">
NAME: filestash<br />
LAST DEPLOYED: Wed Apr  1 03:02:44 2026<br />
NAMESPACE: default<br />
STATUS: deployed<br />
REVISION: 1<br />
DESCRIPTION: Install complete<br />
</span>
<span class="prompt">~/$ </span>kubectl wait --for=condition=available deploy/filestash --timeout=120s<br />
<span class="stdout">
deployment.apps/filestash condition met<br />
</span>
<span class="prompt">~/$ </span>helm test filestash<br />
<span class="stdout">
NAME: filestash<br />
LAST DEPLOYED: Wed Apr  1 03:02:44 2026<br />
NAMESPACE: default<br />
STATUS: deployed<br />
REVISION: 1<br />
TEST SUITE:     filestash-test<br />
Last Started:   Wed Apr  1 03:03:23 2026<br />
Last Completed: Wed Apr  1 03:03:27 2026<br />
Phase:          Succeeded<br />
</span>
</div>

<p>Expose it with TLS via <a href="https://cert-manager.io" rel="nofollow">cert-manager</a>:</p>

<div class="terminal">
<span class="prompt">~/$ </span>helm upgrade filestash https://downloads.filestash.app/upload/filestash-helm.tgz \<br />
&nbsp;&nbsp;--set ingress.enabled=true \<br />
&nbsp;&nbsp;--set ingress.host=204-168-158-47.nip.io \<br />
&nbsp;&nbsp;--set ingress.tls=true<br />
<span class="stdout">
Release "filestash" has been upgraded. Happy Helming!<br />
NAME: filestash<br />
LAST DEPLOYED: Wed Apr  1 03:06:08 2026<br />
NAMESPACE: default<br />
STATUS: deployed<br />
REVISION: 2<br />
DESCRIPTION: Upgrade complete<br />
</span>
</div>

<p>For production, you can manage configuration as a ConfigMap. Configure your instance through the admin console, extract the resulting config.json, then use it across all replicas:</p>

<div class="terminal">
<span class="prompt">~/$ </span>kubectl cp $(kubectl get pod -l app=filestash -o jsonpath='{.items[0].metadata.name}'):/app/data/state/config/config.json config.json<br />
<span class="prompt">~/$ </span>helm upgrade filestash https://downloads.filestash.app/upload/filestash-helm.tgz \<br />
&nbsp;&nbsp;--set-file config=config.json \<br />
&nbsp;&nbsp;--set ingress.enabled=true \<br />
&nbsp;&nbsp;--set ingress.host=204-168-158-47.nip.io \<br />
&nbsp;&nbsp;--set ingress.tls=true<br />
<span class="stdout">
Release "filestash" has been upgraded. Happy Helming!<br />
NAME: filestash<br />
LAST DEPLOYED: Thu Apr  2 02:24:59 2026<br />
NAMESPACE: default<br />
STATUS: deployed<br />
REVISION: 3<br />
DESCRIPTION: Upgrade complete<br />
</span>
</div>
<p>
    To learn more about the structure of the config file, see the <a href="/docs/guide/configuration.html">configuration guide</a>.
</p>

<p>Uninstall:</p>

<div class="terminal">
<span class="prompt">~/$ </span>helm uninstall filestash<br />
<span class="stdout">
release "filestash" uninstalled<br />
</span>
</div>

<p><strong>Note for Ingress Configuration</strong>: make sure your ingress is as transparent as possible. Some ingress providers (like <a href="https://doc.traefik.io/traefik/reference/install-configuration/configuration-options/#opt-entrypoints-name-transport-respondingtimeouts-readtimeout">traefik</a> and <a href="https://nginx.org/en/docs/http/ngx_http_proxy_module.html#proxy_connect_timeout">nginx</a>) enforce 60s timeout which will break large uploads or downloads. Also ensure your ingress does not try to do any kind of <a href="https://nginx.org/en/docs/http/ngx_http_proxy_module.html#proxy_request_buffering">clever caching / buffering</a> so the upload progress users see reflects the actual transfer to the backend, not the proxy absorbing data. The Helm chart handles this automatically for nginx ingress.</p>]]></content><author><name></name></author><summary type="html"><![CDATA[A guide on how to install Filestash on Kubernetes using Helm.]]></summary></entry><entry><title type="html">Config Migration Guide</title><link href="https://www.filestash.app/2026/03/11/migration-config/" rel="alternate" type="text/html" title="Config Migration Guide" /><published>2026-03-11T00:00:00+00:00</published><updated>2026-03-11T00:00:00+00:00</updated><id>https://www.filestash.app/2026/03/11/migration-config</id><content type="html" xml:base="https://www.filestash.app/2026/03/11/migration-config/"><![CDATA[<p><strong>step1:</strong> add this helper function:</p>
<div class="highlighter-rouge"><div class="highlight"><pre class="highlight"><code>function format(responseAdminConfig, responsePublicConfig = {result : {connections: []}}) {
      const config = JSON.parse(JSON.stringify(responseAdminConfig.result, (key, val) =&gt; {
          if (val &amp;&amp; typeof val === "object" &amp;&amp; "label" in val &amp;&amp; "value" in val) {
              return val.value;
          }
          return val;
      }, 2));
      config.connections = responsePublicConfig.result.connections;
      delete config.constant;
      console.log(JSON.stringify(config, null, 4))
}
</code></pre></div></div>

<p><strong>step2:</strong> copy the response from /admin/api/config:</p>
<div class="highlighter-rouge"><div class="highlight"><pre class="highlight"><code>const a = {
    "status": "ok",
    "result": {
        ...
     }
}
</code></pre></div></div>

<p><strong>step3:</strong> copy the response from /api/config</p>
<div class="highlighter-rouge"><div class="highlight"><pre class="highlight"><code>const b = {
    "status": "ok",
    "result": {
        ....
    }
}
</code></pre></div></div>

<p><strong>step4:</strong> get your config</p>
<div class="highlighter-rouge"><div class="highlight"><pre class="highlight"><code>format(a, b);
</code></pre></div></div>]]></content><author><name></name></author><summary type="html"><![CDATA[step1: add this helper function: function format(responseAdminConfig, responsePublicConfig = {result : {connections: []}}) { const config = JSON.parse(JSON.stringify(responseAdminConfig.result, (key, val) =&gt; { if (val &amp;&amp; typeof val === "object" &amp;&amp; "label" in val &amp;&amp; "value" in val) { return val.value; } return val; }, 2)); config.connections = responsePublicConfig.result.connections; delete config.constant; console.log(JSON.stringify(config, null, 4)) }]]></summary></entry><entry><title type="html">Guide to Authorization in Filestash</title><link href="https://www.filestash.app/docs/guide/authorization.html" rel="alternate" type="text/html" title="Guide to Authorization in Filestash" /><published>2026-03-06T00:00:00+00:00</published><updated>2026-03-06T00:00:00+00:00</updated><id>https://www.filestash.app/docs/guide/authorisation</id><content type="html" xml:base="https://www.filestash.app/docs/guide/authorization.html"><![CDATA[<p>Authorisation is one of those topics that confuses a lot of people. After years of calls with organisations of all sizes, we’ve found it helps to start from first principles.</p>

<p>A Filestash deployment will typically have 3 components configured to answer 1 question: <strong>“who can do what and where?”</strong> with the 3 components being: storage, authentication, and authorisation. <strong>Storage is the “where”</strong>, <strong>authentication is the “who”</strong>, and <strong>authorisation is</strong> what links them together: the “<strong>… can do what …</strong>” that sits between identity and resource.</p>

<p>Many platforms push RBAC as the default model. Filestash doesn’t. RBAC is overkill for simple use cases and often too blunt for complex ones. What matters is the underlying model, which is the same regardless of implementation: after authentication, Filestash receives some information about the user as part of its session. That information can be anything (AD groups included). The authorisation layer takes that identity, looks at what the user is trying to access, and runs a function that returns one of two answers: grant or deny. Formally: <code class="highlighter-rouge">f(identity, resource) -&gt; grant | deny</code>. The guide is a tour of the various implementations of that function, of which RBAC is just one particular implementation.</p>

<h2 id="option-1-inline-access-control">Option 1: Inline access control</h2>

<p>The simplest and most direct approach. When a user authenticates, their session is populated with attributes from your IDP. Those attributes are then used to compute access rights on the spot, expressed as a set of allowed filesystem operations: <code class="highlighter-rouge">ls</code>, <code class="highlighter-rouge">cat</code>, <code class="highlighter-rouge">mkdir</code>, <code class="highlighter-rouge">mv</code>, <code class="highlighter-rouge">rm</code>, <code class="highlighter-rouge">touch</code>, <code class="highlighter-rouge">save</code>. You can either hardcode those rights directly, or define rules that compile down to them.</p>

<p><img class="fancy" src="/img/screenshots/feature_authorization.png" style="object-fit: cover; object-position: bottom; max-height: 350px; width: 100%;" /></p>

<p>From there, you can layer additional controls on top:</p>
<ol>
  <li><strong>chroot jails</strong>: lock users into a specific folder, preventing navigation above it</li>
  <li><strong>allow lists</strong>: filter what is visible within the accessible tree, useful for hiding folders without denying the parent path</li>
  <li><strong>read-only folders</strong>: restrict write operations on specific paths</li>
  <li><strong><a href="/docs/guide/virtual-filesystem.html">virtual filesystem</a></strong>: apply access rules to paths that don’t physically exist on the storage, letting you present a structure independent of what’s actually there</li>
</ol>

<h2 id="option-2-rbac">Option 2: RBAC</h2>

<p>RBAC maps the authorisation function to roles: <code class="highlighter-rouge">f(role) -&gt; permissions</code>. It’s the most widely used model, and for good reason. When your access patterns map naturally to roles, it’s clean and easy to reason about.</p>

<p>The practical test: take a sheet of paper and sketch your access patterns. If they summarise neatly into roles, RBAC is a good fit. If you find yourself contorting the role model to cover edge cases, it probably isn’t.</p>

<p>Once enabled in Filestash, it looks like this:</p>

<p><img class="fancy" src="https://downloads.filestash.app/img/app-filestash-www-img-screenshots-rbac.png" /></p>

<p>Given a role derived from the authentication output, you define the rules that determine what that role can access and how.</p>

<h2 id="option-3--4-external-delegation">Option 3 &amp; 4: External delegation</h2>

<p>Sometimes you might want to externalise the whole authorisation to a third party system, which is what these two options are about:</p>

<ul>
  <li><strong>Option 3: plg_authorisation_cerbos</strong>: delegates to <a href="https://github.com/cerbos/cerbos">Cerbos</a>, an open-source policy-as-code engine.</li>
  <li><strong>Option 4: plg_authorisation_iam</strong>: delegates to AWS IAM.</li>
</ul>

<h2 id="option-5-custom-plugin">Option 5: Custom plugin</h2>

<p>If your use case grows in complexity and none of the above fits, you can implement the authorisation plugin yourself by implementing the same interface all the options above are built upon:</p>
<div class="highlighter-rouge"><div class="highlight"><pre class="highlight"><code>type IAuthorisation interface {
	Ls(ctx *App, path string) error
	Cat(ctx *App, path string) error
	Stat(ctx *App, path string) error
	Mkdir(ctx *App, path string) error
	Rm(ctx *App, path string) error
	Mv(ctx *App, from string, to string) error
	Save(ctx *App, path string) error
	Touch(ctx *App, path string) error
}
</code></pre></div></div>

<p>The interface is not about read or write, it gives you the flexibility to handle all the access patterns you might ever encounter. In all the use cases we’ve seen so far, this interface has never been defeated. If you think you have a use case that breaks it, reach out. We want to know and fix it, because our goal is to have the mother of all interfaces to model any kind of authorisation scheme.</p>

<p>To illustrate: we built a custom plugin for a strata management company in California. Each S3 bucket represented a unit under their management. Homeowners have read only access to their own unit but are blocked from folders containing accounting, invoices, and other management documents, which were only accessible to board and committee members with rules defined per unit. Home owners could own multiple properties and act in different roles depending on the unit. Managers had broader access, admins had full access. The edge cases were complex enough that we fully unit tested the access rules but more importantly, the underlying model never failed: given who the user is and what they are trying to access, return grant or deny.</p>

<p>The rule of thumb: use simple solutions for simple problems. When your use case grows complex, Filestash has the flexibility to go as far as you need.</p>]]></content><author><name></name></author><summary type="html"><![CDATA[Authorisation, or the art of enforcing who can do what and where]]></summary></entry><entry><title type="html">Guide to search in Filestash</title><link href="https://www.filestash.app/docs/guide/search.html" rel="alternate" type="text/html" title="Guide to search in Filestash" /><published>2026-03-06T00:00:00+00:00</published><updated>2026-03-06T00:00:00+00:00</updated><id>https://www.filestash.app/docs/guide/search</id><content type="html" xml:base="https://www.filestash.app/docs/guide/search.html"><![CDATA[<p>Search is not a “one size fits all”, which is why Filestash delegates that decision to a plugin so you can pick the best solution for your own needs in line with our philosophy of a plugin-driven architecture. The default ships as a simple recursive implementation. Not because it’s the most powerful, but because we wouldn’t want Filestash indexing your content continuously by default, costing you CPU, network resources, and real money if you’re on a large S3 bucket where AWS charges per API call and for bandwidth. The options are:</p>

<p><strong>Option 1: null</strong>: not every use case requires search. If you don’t define a search plugin, the search bar disappears entirely.</p>

<p><strong>Option 2: plg_search_stateless</strong>: the default for every build. Not the most powerful option, but it’s stateless, there is no index to maintain and it makes no assumptions about where an index lives, how it gets populated, or whether there’s a cost to building one.</p>

<p><strong>Option 3: plg_search_sqlitefts</strong>: the default choice for basic full-text search capabilities. The largest instance we run with this plugin indexes 55 million objects on S3 that are updated continuously by an ERP system in the background. At that scale, fine-tuning the indexer configuration matters. Under the hood the plugin runs its own crawler through four phases:</p>
<ol>
  <li><strong>discovery</strong>: maps the filesystem tree and tracks new files and folders. Visits and filesystem operations are used as hints to prioritise what the crawler processes next. You can also trigger this phase via the workflow engine if you want tight control over when it runs.</li>
  <li><strong>indexing</strong>: extracts file content and feeds it into the full-text search index. There are many options for content extraction. Reach out if you need OCR or more specialised processing.</li>
  <li><strong>maintenance</strong>: keeps the index from going stale by reflecting the current state of the filesystem.</li>
  <li><strong>pause</strong>: backs off when there is nothing to do to avoid unnecessary load.</li>
</ol>

<p><strong>Option 4: <a href="/features/semantic-search.html">plg_search_semanticsearch</a></strong>: a thin wrapper on top of plg_search_sqlitefts that uses an LLM to translate natural language queries into FTS queries, so you don’t need to be an expert in the SQLite FTS5 extension to run precise searches.</p>

<p><strong>Option 5: plg_search_elasticsearch</strong>: for organisations that already have an Elasticsearch cluster and want to use it as their Filestash search backend.</p>

<p><strong>Option 6: plg_search_solr</strong>: same idea as option 5, but for Solr.</p>

<p>Beyond these options, some plugins can also hook into the search engine to power <a href="/features/smart-folder.html">smart folder</a> functionality. plg_widget_recent, for example, keeps track of your activity and exposes a Recent folder that accepts natural language queries, letting users ask things like: “show me all the raw images I worked on today ordered by size”.</p>

<p><img class="fancy" src="https://i.imgur.com/s4uqR4I.png" /></p>

<p><strong>How to make your own search plugin:</strong> a search plugin in Filestash implements a single interface:</p>
<div class="highlighter-rouge"><div class="highlight"><pre class="highlight"><code>type ISearch interface {
	Query(ctx App, basePath string, term string) ([]IFile, error)
}
</code></pre></div></div>
<p>Create your own and register it by calling <code class="highlighter-rouge">Hooks.Register.SearchEngine</code>. That’s exactly how all the plugins above are built.</p>]]></content><author><name></name></author><summary type="html"><![CDATA[Everything you need to know to pick and configure the right search plugin for your Filestash instance.]]></summary></entry><entry><title type="html">Guide to the workflow engine</title><link href="https://www.filestash.app/docs/guide/workflow-engine.html" rel="alternate" type="text/html" title="Guide to the workflow engine" /><published>2026-03-05T00:00:00+00:00</published><updated>2026-03-05T00:00:00+00:00</updated><id>https://www.filestash.app/docs/guide/workflow-engine</id><content type="html" xml:base="https://www.filestash.app/docs/guide/workflow-engine.html"><![CDATA[<p>The workflow engine is about <strong>“doing things when something happens”</strong>. Split that sentence and you have two pieces:</p>
<ol>
  <li><strong>“doing things …“</strong>: the actions to run, like notifying someone over email, making an API call, etc.</li>
  <li><strong>“… when something happens”</strong>: the trigger that starts the workflow, like a webhook, a scheduled time, a file event, etc.</li>
</ol>

<p>The general mental model is:</p>
<div class="highlighter-rouge"><div class="highlight"><pre class="highlight"><code>[trigger] -&gt; [actionA] -&gt; [actionB]
</code></pre></div></div>

<p>The trigger produces data, actions consume and transform it, each step feeding the next. To see the workflows you have set up, head to <code class="highlighter-rouge">/admin/workflow</code>:</p>

<p><img src="http://downloads.filestash.app/img/app-filestash-www-img-screenshots-workflow-list.png" class="fancy" /></p>

<h2 id="triggers">Triggers</h2>

<p>A trigger defines when a workflow needs to run. While we ship with standard triggers based on file events, filesystem changes, webhooks and time-based schedules, there are other niche ones for triggering workflows when you receive an email with an attachment, when a user session changes, etc.</p>

<p>Things get interesting when plugins create their own triggers. Take the comment plugin as an example: it has a mention-based trigger that lets you control what happens whenever somebody mentions someone else while commenting on a file, which is handy for connecting to Slack, email, or any messaging app you want to hook into.</p>

<p><strong>How to make your own trigger:</strong> if you look under the hood, a trigger is nothing more than an implementation of this interface:</p>
<div class="highlighter-rouge"><div class="highlight"><pre class="highlight"><code>type ITrigger interface {
	Manifest() WorkflowSpecs
	Init() (chan ITriggerEvent, error)
}
</code></pre></div></div>
<p>Create your own and register it as a plugin by calling <code class="highlighter-rouge">Hooks.Register.WorkflowTrigger</code> and you are good to go. Any configuration you expose to administrators goes through the template engine, meaning admins can pass environment variables directly and your code will see the expanded result:</p>

<p><img src="http://downloads.filestash.app/img/app-filestash-www-img-screenshots-workflow-detail.png" class="fancy" /></p>

<h2 id="actions">Actions</h2>

<p>Actions are what run once a trigger fires. Each action receives the data produced so far, does its thing, and passes the result to the next step. Chain as many as you need. We ship with a couple standard actions to send emails and make HTTP calls but things get interesting when plugins register their own actions.</p>

<p>For example, the built-in full-text search engine defines its own action to rebuild the index.</p>

<p><strong>How to make your own action:</strong> an action is nothing more than an implementation of this interface:</p>
<div class="highlighter-rouge"><div class="highlight"><pre class="highlight"><code>type IAction interface {
	Manifest() WorkflowSpecs
	Execute(params map[string]string, input map[string]string) (map[string]string, error)
}
</code></pre></div></div>
<p>Create your own in a plugin and register it by calling <code class="highlighter-rouge">Hooks.Register.WorkflowAction</code>. The <code class="highlighter-rouge">input</code> map is what the previous step passed down, <code class="highlighter-rouge">params</code> is what the admin configured, and whatever you return becomes the input for the next action.</p>]]></content><author><name></name></author><summary type="html"><![CDATA[Automate anything that happens to your files by chaining actions on events.]]></summary></entry><entry><title type="html">Excel online | A free online editor for your microsoft office documents</title><link href="https://www.filestash.app/excel-online.html" rel="alternate" type="text/html" title="Excel online | A free online editor for your microsoft office documents" /><published>2026-03-02T00:00:00+00:00</published><updated>2026-03-02T00:00:00+00:00</updated><id>https://www.filestash.app/excel-online</id><content type="html" xml:base="https://www.filestash.app/excel-online.html"><![CDATA[<link rel="stylesheet" href="/css/landing-page.css">
<link rel="stylesheet" href="/css/landing-page-login.css">

<style>
 #nav a[href="/tunnel/demo/?origin=menu::cta"] {
     display: none;
 }
 #appframe{ width: 100%; height: 80vh; height: calc(90vh - 56px); position: relative; }
 #appframe iframe, #appframe .appframe-loader{ width: 100%; height: 100%; }
 #appframe .appframe-loader{
     position: absolute;
     top: 0;
     left: 0;
     background: var(--secondary);
     color: var(--emphasis-primary);
     font-size: 20px;
     text-align: center;
     margin: 0 auto;
     line-height: 22px;
     transition: 1s ease all;
 }
 #appframe .appframe-loader .spinner{
     margin-top: 25vh;
 }
 #appframe .appframe-loader.animate-out{
     opacity: 0;
 }

 .spinner {
     border: 8px solid var(--emphasis);
     border-radius: 50%;
     border-top: 8px solid var(--emphasis-primary);
     width: 60px;
     height: 60px;
     -webkit-animation: spin 2s cubic-bezier(0.445, 0.05, 0.55, 0.95) infinite; /* Safari */
     animation: spin 2s cubic-bezier(0.445, 0.05, 0.55, 0.95) infinite;
     margin: 0 auto 10px auto;
 }
 @-webkit-keyframes spin {
     0% { -webkit-transform: rotate(0deg); }
     100% { -webkit-transform: rotate(360deg); }
 }
 @keyframes spin {
     0% { transform: rotate(0deg); }
     100% { transform: rotate(360deg); }
 }

 #main h1{ text-align: center; }
 #main h2{ margin-bottom: 20px; }
 .brand-integrations { display: flex; flex-wrap: wrap; }
 .brand-integrations > div > a {
     display: block;
     background: rgba(0,0,0,0.05);
     padding: 15px 0px;
     border-radius: 5px;
     color: var(--emphasis);
     margin: 10px 10px;
     box-sizing: border-box;
     width: 180px;
     font-size: 22px;
     text-align: center;
     text-decoration: none!important;
     transition: 0.1s ease background;
 }
 .brand-integrations.smaller > div > a {
     width: 70px;
     margin: 5px;
     white-space: nowrap;
     overflow: hidden;
     text-overflow: ellipsis;
 }
 .brand-integrations > div > a[href]:hover{
     color: var(--bg-color);
     background: var(--emphasis);
 }
 .brand-integrations img {
     display: block;
     height: calc(100% - 50px);
     width: 100%;
     height: 100px;
     padding-top: 15px;
 }
 .other-choice{
     font-size: 20px;
     font-style: italic;
     text-align: center;
     margin-top: 50px;
 }

 .share_buttons{ margin-top: 120px!important; margin-bottom: 120px!important; }
</style>

<div id="appframe">
    <iframe frameborder="0"></iframe>
    <div class="appframe-loader">
        <div class="spinner"></div>
        Preparing your <br> office editor
    </div>
</div>
<script>
 let userID = location.search.replace(/\?sessionID=([a-zA-Z0-9]+).*/, "$1");
 if (userID == "") userID = location.hash.replace(/#sessionID=([a-zA-Z0-9]+).*/, "$1");
 if (userID == "") {
     let m = document.cookie.match(/^webid=([^;]*)/);
     userID = m ? m[1] : btoa(Math.random() * 100000).replace(/[^a-zA-Z0-9]/g, "");
     location.hash = `sessionID=${userID}`;
 }
 document.querySelector("#appframe iframe").setAttribute(
     "src",
     "https://demo.filestash.app/login?type=tmp&next=/view/tmp.xlsx%3Fnav=false&userID=" + userID,
 );
 (function(){
     var $iframe = document.querySelector("#appframe iframe");
     var $loader = document.querySelector("#appframe .appframe-loader");
     $iframe.addEventListener("load", function(){
         window.setTimeout(function(){
             $loader.classList.add("animate-out");
             window.setTimeout(function(){
                 $loader.remove();
             }, 1500);
         }, 5000);
     });
     $iframe.addEventListener("error", function(){
         $loader.innerHTML = "Couldn't load the application";
     });
 })()
</script>
<div id="latest-activity" class="hidden">
    <a>Currently <br> Active Session:</a>
</div>
<style>
 #latest-activity {
     display: flex;
     overflow-x: scroll;
 }
 #latest-activity::-webkit-scrollbar {
     display: none;
 }
 #latest-activity a {
     background: var(--dark);
     padding: 5px 2px;
     color: white;
     font-size: 0.7rem;
     text-align: center;
     min-width: 170px;
     font-family: monospace;
 }
 #latest-activity a:hover {
     background: var(--emphasis);
 }
 #latest-activity > a:first-child {
     background: var(--color);
     font-weight: bold;
 }
</style>
<script>
 async function displayAll() {
     let activities = await fetch("https://pages.kerjean.me/projects/filestash/apps/online-now/excel")
         .then((r) => r.text());

     activities = activities.split("\n").map((line) => {
         const parts = line.split(" ")
         return {
             date: parts[0],
             time: parts[1],
             userID: parts[2],
         };
     }).reverse();

     const $activity = document.querySelector("#latest-activity");
     for (let i=0; i<activities.length; i++) {
         if (!activities[i]["userID"]) continue;

         const $el = document.createElement("a");
         const tDiff = (new Date() - new Date(`${activities[i].date} ${activities[i].time} GMT+0000`)) / 1000;
         let timeString = ``;
         const pluralise = (d) => Math.ceil(d) > 1 ? "s" : "";
         if (tDiff < 100) timeString = `${Math.ceil(tDiff)} second${pluralise(tDiff)} ago`;
         else if (tDiff < 100*60) timeString = `${Math.ceil(tDiff / 60)} minute${pluralise(tDiff/60)} ago`;
         else timeString = `${Math.ceil(tDiff / 60 / 60)} hour${pluralise(tDiff/60/60)} ago`;

         try {
             if (document.querySelector("#session-" + activities[i]["userID"])) continue;
         } catch(err) {
             continue;
         }
         $el.setAttribute("id", "session-" + activities[i]["userID"]);
         $el.href = `${location.pathname}?sessionID=${activities[i]["userID"]}`
         $el.innerHTML = `
         SessionID: ${activities[i]["userID"].substring(0,12)} <br>
         ${timeString}`;
         $activity.appendChild($el);
     }
     if (activities.length === 0) $activity.setAttribute("style", "opacity:0");
 }
 displayAll()
</script>


<h1 style="font-size: 2.4rem; line-height: 40px; text-align:center; margin-top: 60px; margin-bottom: 100px;color: var(--secondary);">The <span style="text-decoration: underline;">Sovereign</span> File Management Solution</h1>

<div id="features">
    <div class="container large">
        <div class="row features main">
            <div class="feature">
                <img alt="screenshot of Filestash when uploading files/folders" loading="lazy" class="fancy pull-left hidden-xs with-zoom" src="/img/screenshots/feature1.png">
                <h3>Secure File Sharing</h3>
                <p>
                  Effortlessly browse, organize, and share files across all your storage solutions via one intuitive interface with bridges to expose your data via <a href="/docs/guide/sftp-gateway.html">SFTP</a>, <a href="/docs/guide/mcp-gateway.html">MCP</a> or S3 for all underlying storage platform / protocol
                </p>
                <img alt="screenshot of Filestash when uploading files/folders" loading="lazy" class="fancy visible-xs" src="/img/screenshots/feature1.png">
            </div>
            <div class="feature">
                <img alt="screenshot of the admin console which shows the setup of the SSO integration" loading="lazy" class="fancy pull-right hidden-xs with-zoom" src="/img/screenshots/feature_sso.png">
                <h3>SSO Integration &amp; RBAC</h3>
                <p>
                  Filestash integrates with your corporate SSO systems like LDAP, SAML, and OIDC, providing an authentication process that's familiar to your users and trusted by your sysadmins with RBAC capabilities to control who can do what and where
                </p>
                <img alt="screenshot of the admin console which shows the setup of the SSO integration" loading="lazy" class="fancy visible-xs" src="/img/screenshots/feature_sso.png">
            </div>

            <div class="feature">
                <img loading="lazy" class="fancy pull-left hidden-xs with-zoom" src="https://imgur.com/3iuXeRG.png">
                <h3>Gateway</h3>
                <p>
                  Filestash acts as a gateway to expose your files through standard protocols like SFTP, S3 or MCP, allowing your users and applications to access your data from their existing tools and applications.
                </p>
                <img loading="lazy" class="fancy visible-xs" src="https://imgur.com/3iuXeRG.png">
            </div>

            <div class="feature">
                <img alt="White-Label Solution example" loading="lazy" class="fancy pull-right hidden-xs with-zoom" src="/img/screenshots/feature_branding.png">
                <h3>White-Label Solution</h3>
                <p>
                  Personalize Filestash's appearance to complement your company's branding. You can deploy as your own with extensive white-label capabilities to meet your business needs, and integrating with your existing systems.
                </p>
                <img alt="White-Label Solution example" loading="lazy" class="fancy visible-xs" src="/img/screenshots/feature_branding.png">
            </div>

            <div class="feature">
                <img loading="lazy" class="fancy pull-left hidden-xs with-zoom" src="https://imgur.com/doth9YT.png">
                <h3>Workflow Engine</h3>
                <p>
                   The workflow engine automates processes in response to events by chaining actions. These workflows orchestrate tasks, with the ability to extend processing through the plugin system.
                </p>
                <img loading="lazy" class="fancy visible-xs" src="https://imgur.com/doth9YT.png">
            </div>

            <div class="feature">
                <img alt="Filestash plugins" loading="lazy" class="fancy pull-right hidden-xs with-zoom" src="/img/screenshots/feature_plugins.png">
                <h3>Extendable through <a style="color:inherit;text-decoration:underline" href="/docs/plugin/">plugins</a></h3>
                <p>
                  Filestash's plugin-based architecture is designed for versatility, catering to diverse business needs. For specialized or custom requirements, we can develop additional plugins tailored to your specifications.
                </p>
                <img alt="Filestash plugins" loading="lazy" class="fancy visible-xs" src="/img/screenshots/feature_plugins.png">
            </div>

            <div class="feature">
                <img loading="lazy" class="fancy pull-left hidden-xs with-zoom" src="/img/screenshots/feature_audit.png">
                <h3>Audit &amp; Compliance</h3>
                <p>
                  Filestash provides extensive compliance grade audit logs that are immutable, tamper proof, traceable, timestamped and non-repudiable so you know who did what and where, while staying GDPR compliant
                </p>
                <img loading="lazy" class="fancy visible-xs" src="/img/screenshots/feature_audit.png">
            </div>

            <h3 style="text-align:center;margin-top:-120px;margin-bottom:200px;">And Many More Features...</h3>
        </div>
    </div>


    <div class="call-to-action">
        <h2>Put us to the test</h2>
        <a class="btn light" href="/tunnel/demo/?origin=landing::home&amp;modal=enterprise">Book a demo</a>&nbsp;&nbsp;
        <a class="btn light" href="/pricing/?origin=landing::home&amp;modal=enterprise">Get In Touch</a>
    </div>

</div>]]></content><author><name></name></author><category term="tool" /><summary type="html"><![CDATA[View and edit Excel spreadsheets online with our file management tools. Start working on your spreadsheets instantly without any login needed!]]></summary></entry></feed>